Thursday, September 5, 2024


 Buvette Warm Chicken Salad

Prep Time: 20 minutes

Cook Time: 55 minutes

Servings: 6


Ingredients

For the Chicken:

  • One 3-to-4-pound chicken
  • 2 tablespoons olive oil
  • 1 tablespoon ground fennel seeds (note from Pat: I despise fennel, so I leave these out, but thought I should include in the recipe, for the sake of those who like the anise/licorice flavor)
  • 1 tablespoon Herbes de Provence
  • Kosher salt and freshly ground black pepper, to taste, but don't be stingy!

For the Dressing:

  • ½ cup olive oil
  • 2 tablespoons sherry vinegar
  • 1 tablespoon warm water
  • ½ tablespoon Dijon mustard
  • ½ tablespoon whole-grain mustard
  • ½ teaspoon minced thyme
  • 1 shallot, minced
  • 1 garlic clove, grated
  • Kosher salt and freshly ground black pepper, to taste

For the Salad:

  • 12 ounces baby new potatoes
  • 6 ounces haricots verts, trimmed and halved
  • 2 endives, sliced into 1-inch pieces*
  • 1 head Bibb lettuce, leaves roughly torn*
  • 1 head frisée, stem removed and leaves roughly torn*
  • 6 radishes, thinly sliced


*I use whatever greens I have, even if it is a bag of Spring Mix from the store.

Directions

1.     Make the chicken: Preheat the oven to 400°. Tie the legs of the chicken together at the ankles with butcher's twine. Pat the chicken dry with paper towels. Place the chicken in a 9-by-13-inch baking dish and rub with the olive oil, ground fennel and herbes de Provence. Season liberally with salt and pepper. Cook until golden brown and an internal temperature of 165° is reached, 55 to 60 minutes. Let it rest for 10 minutes before carving. Roughly chop the breast, thigh and leg meat, keeping the skin on, and transfer to a bowl. Discard the carcass** and pour the pan drippings over the chicken.

2.     Meanwhile, make the dressing: In a medium bowl, whisk together all the ingredients except the salt and pepper until smooth. Season with salt and pepper, then set aside.

3.     Prepare the salad: In a pot of boiling salted water, cook the potatoes until tender, 12 to 15 minutes. Using a slotted spoon, remove the potatoes and transfer to a bowl, slicing in half lengthwise once cool enough to handle. To the pot of boiling water, add the green beans and cook until tender, 3 minutes. Meanwhile, prepare an ice bath to transfer the green beans to after they are cooked. Once cool, drain the green beans and set aside.

4.     In a large bowl, toss the endive, Bibb lettuce, frisée and radishes with ¼ cup of the dressing. Lay out on a platter; toss the potatoes and green beans with another ¼ cup of the dressing and scatter on top of the lettuce. Top the salad with chopped chicken and serve.

** Do not discard the carcass!!! These are the words of the original recipe, not mine! Make chicken broth!  Make soup!

You can make the chicken -- and really even the potatoes and beans -- ahead, but do warm them up for serving, because part of what makes this so enjoyable is the contrast of the warm food and the cold, crisp food! The vinaigrette is also useful for just about any salad. And of course, you can add or exchange just about any veggies, such as sugar snap peas for green beans. 

You can even use a store-bought rotisserie chicken if you really have to, but it won't taste as good! The Herbes de Provence on this just makes it really yummy.


Monday, September 18, 2023

 Spicy bean soup

1 ham bone and ham trimmings

1 pound Great Northern beans

1 large or two small onions, diced

2-3 ribs of celery, diced

2-3 carrots, sliced into "coins"

2 cans Ro-Tel diced tomatoes with green chilis

1/2 tsp to 1 tsp white pepper (to taste) (can use black pepper if you don't have white

1/2 teaspoon ground Ancho chili pepper if you have it

dried savory, 1 tsp

Herbs de Provence, approx 1 tsp


First, make the ham stock.  Cut as much "good" ham as you can off of the bone and put back in the fridge.  Put the ham bone in a large pot or kettle, cover with water and bring to a boil. Reduce heat so the water is just simmering. Simmer for about 2 hours.

When the broth seems ready -- the ham that was still on the bone should be about to fall away -- remove the bone and any "used up" pieces of ham that may have come away. (This can be done in advance and the broth refrigerated overnight, then brought back to a simmer when you're ready to proceed.)

Rinse the beans and inspect them, getting rid of any stones or other trash and any beans that are discolored.  Add them to the simmering broth. Cook until tender, about an hour. Test by removing a bean from the pot and seeing if you can easily smash it with the back of a spoon.

Meanwhile, wash and chop the celery, carrots and onion. Saute them in a bit of oil and butter, seasoning with a little salt, but not too much at this stage, because ham is usually pretty salty!

When beans are tender, add the sauteed vegetables, the diced tomatoes with chili, the herbs, and the ham that you rescued earlier from the bone. Taste and season with salt if needed, and peppers to taste. 


Notes: This soup as I made it is not as thick as typical bean soup, although that will depend partly on how much water you use to make the broth and how much broth you use to make the soup! If the soup is thicker than you'd like, just add more water!

The canned diced tomatoes with green chili really add the zing, but if you don't like that, go with regular canned tomatoes. 

Cornbread makes a nice accompaniment. You could, of course, add frozen corn or other veggies of your choice.


Wednesday, July 5, 2023


Stuffed red bell peppers


In this case, frugality was the mother of invention, or at least of improvisation. I had a couple of red bell peppers that I knew I should use, a few Campari tomatoes (which I hope will be the last tomatoes I need to buy from a store for a while) that were getting ready to give up, and some leftover roast chicken that I wanted to use for something besides a sandwich.  I also had some uncooked Faro (a grain) that has been in the fridge for a while because I didn't want it to go rancid or anything, and some ingredients in the freezer that had been there a while: homemade pesto,  homemade chicken broth, a package of shredded mozzarella, and a package of pepperoni that has been frozen since sometime during the pandemic. I also had a bunch of green onions that I bought a couple of weeks ago and ended up not using as I had intended. So, here's what happened.


2 red bell peppers, cut lengthwise from stem to bottom, stem, rib and seeds removed

Filling:

2 cups (measured uncooked) faro, rinsed and cooked according to pkg.

5 Campari tomatoes (approximately golf-ball size)

Leftover roasted (or rotisserie) chicken, diced/shredded, about 2 cups

2 cubes frozen chicken broth

2 cubes frozen pesto

Frozen pepperoni, chopped, about a cup

6 green onions (chop white/green part for mix, save green tops for garnish if desired)

1 pkg shredded mozzarella, approximately half in the mix and the rest on top.

Bake at 375 for 25-30 minutes


Notes:

1.    1. This makes way too much filling for the 2 peppers that I had, but I just put it in the casserole dish underneath the stuffed peppers. Because, really, the filling is (mostly) the point. Having extra is not a problem!

2.  2.   I did not add salt and pepper to the mix, because I was using ingredients with varying amounts of seasoning in them: the chicken, the pepperoni, the chicken broth (made from bones of a very seasoned roast chicken), the pesto. Once it was all baked and had a chance for the flavors to meld, it was actually pretty close to perfect. I added a sprinkle of salt to my serving, just because I like food saltier than many people do.

3.    3. If I weren’t using the pepperoni or a highly seasoned Italian sausage, I’d probably add red pepper flakes or at least black pepper.

4.   4.  I have a silicone compartmentalized tray that makes cubes that are just a wee bit bigger than a standard ice cube tray. I use it to freeze chicken broth, pesto, even eggs (one egg fits nicely in one compartment). Once frozen, the food can be popped out and put into a plastic bag or other container. When I want a bit of that ingredient for a recipe, I can just take one or two cubes out of the bag, and I’m good.

II5. I am not fond of green bell peppers, but I suppose you could use them instead.


I


Saturday, January 28, 2023

 Basic French bread recipe

(adapted from The Fleischmann Treasury of Yeast Baking, copyright 1962) I've been making this so long that I don't really use the recipe

for 2 loaves

2-1/2 Cups warm water (105 to 115 degrees F)

2 packages active dry yeast 

1 tablespoon salt

1 tablespoon oil or melted butter

7 cups (approx) unsifted flour

-----

for crisper crust, 5 minutes before end of baking, brush loaves with

1 egg white

1 tsp cold water

(or for softer crust, brush with a little butter)

----------

Measure warm water into large mixing bowl. Sprinkle in yeast and stir until dissolved. I usually add a bit of the flour and the oil and let the yeast start working for 15-20 minutes, then add the salt and start adding the rest of the flour a cup or so at a time, stirring with a sturdy wire whisk or dough whisk until dough is too thick for that utensil; then mix with floured hands until dough is only slightly sticky. Turn out into a floured counter or board and knead for a couple of minutes. Clean the bowl, lightly oil it, put the dough back in the bowl and turn the dough to oil the top. Cover with a clean cloth and let rise in a warm place free from draft until doubled, about an hour. 

When dough has doubled, "punch" it down and divide into two. Roll out each half into a rectangle about 15 by 10 inches, then roll up each rectangle tightly to form the loaf. Place on lightly greased baking sheet or baguette pans and let rise again, about 1 hour.

About 15 minutes before the hour is up, put a pan of water on the lowest rack of the oven and start preheating the oven to 450.

Slash top of loaves with razor blade or knife.

Bake at 450 for 25 minutes in middle rack of oven, until loaves are golden brown. If you want to do the glaze thing, brush on the egg white/water mixture about 5 minutes before baking is down.


Thursday, January 20, 2022

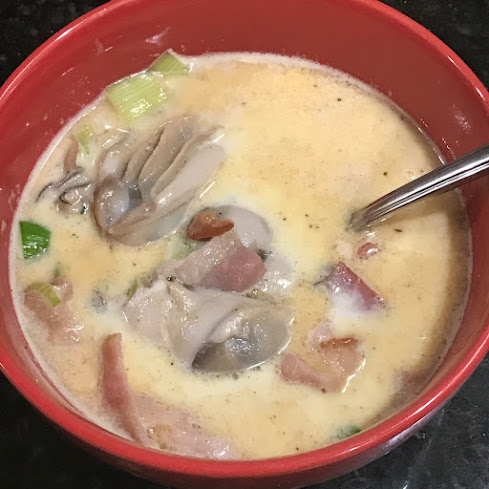
Oyster stew 


 1 leek, mostly just the white part

1 pint of shucked oysters

2 strips of bacon

1 cup skim milk*

1 cup heavy cream *

4 T butter, approximately

salt - about 3/4 tsp, but do it to your taste

pepper -- white pepper if you have it, about 3 shakes or to taste

paprika, at least 1/2 teaspoon, more if you want -- I used Smoked Spanish paprika


1. Prepare the leek. I discarded the outer leaves of the leek because they were the dirtiest and toughest, then sliced off most of the green part, cut it in half lengthwise and rinsed it thoroughly under running water, then chopped each half into about 1/4 inch pieces. 

2. Fry the bacon. I used a large cast iron skillet. Remove bacon from pan, leaving all residual grease.

3. Add about 2 T butter to the pan to supplement the bacon grease, and start sauteeing the leeks. Add salt and pepper.

4. Drain liquid from the oysters into a 3-quart heavy saucepan. Add the milk and cream and begin heating. Add the paprika.

5. If the leeks seem to have absorbed most of the butter, add another 2 T. Pour the oysters into the skillet with the leeks and cook just until the oysters curl at the edges. Do not overcook. **

6. When the liquid is hot, either add the leeks and oysters to the saucepan or, if using a large enough skillet like my chicken fryer, pour the liquid into the skillet. Taste and add more seasoning if you want.

7. Remember that bacon you fried earlier? Cut it up into pieces and put some in a bowl. Then ladle in the stew, making sure to get plenty of oysters!


*I usually have skim milk and cream on hand. If you have whole milk, you could use 1-1/2 cups of whole milk and just 1/2 cup cream, or even all whole milk, in a pinch. 

**The shucked oysters I got this time were quite plump, which is one reason I sizzled them separately before joining them back up with the liquid. If you get small oysters, they could cook right in the liquid once it has heated. Do not add them at the beginning, though, or you're likely to overcook them.


Followers

About Me

My photo
This is me enjoying a limoncello in Rome on the last night of our trip to Italy. Funny thing is, I don't really like limoncello that much, but thought it would be great in a dessert. And wouldn't you know, The Barefoot Contessa just did a great fruit salad with limoncello. So now I can't. Oh, well.