Wednesday, December 21, 2016

Dad's Christmas Stollen


This makes six loaves of the German-style Christmas bread, each enough to serve six or eight people, with coffee. Dad makes the big batch because they freeze well and make good Christmas gifts for people like the choir director, the neighbor who checks the mail for you while you’re away and the kids’ piano teacher.
“Keep one for yourself, and have five good friends,” he suggests.
Ingredients:
2 pkgs. Active dry yeast (or equivalent)
½ cup warm water
2 cups milk, scalded
1 cup (1/2 lb.) butter, melted (can melt it in the scalded milk)
½ cup sugar
2 tsp. salt
½ tsp. ground cardamon
8 cups, approx.., sifted all-purpose flour
2 eggs, slightly beaten
2 cups seedless raisins, black or white or both
½ cup currants*
½ cup chopped, mixed candied fruit*
4 Tbs grated orange peel
2 Tbs grated lemon peel
½ cup chopped, blanched almonds (
optional)
More candied fruit to decorate
For the glaze: 2 cups confectioners sugar, 4 Tbs. milk and a dash of salt.
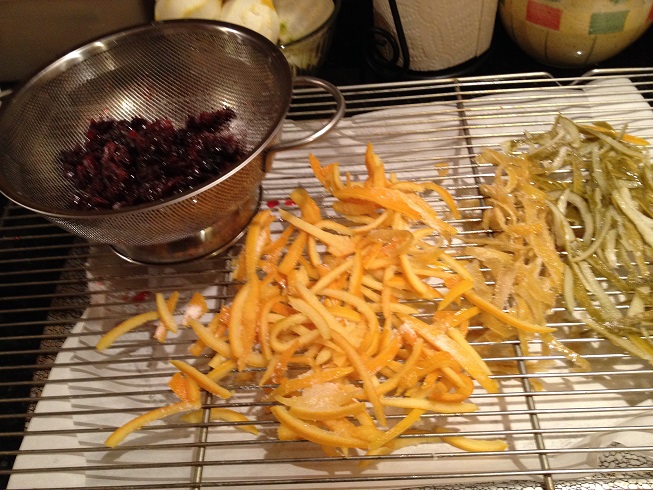
*can use dried fruit such as cranberries “rehydrated” in simple syrup, make your own candied lemon and orange peel in simple syrup. Candied pineapple is nice but pieces need to be chopped up smaller than the chunks it usually comes in
Method:
Combine milk, butter, sugar, salt and cardamom and set aside to cool. Cool to lukewarm. When lukewarm, stir in four cups of the flour. Beat well. Add softened yeast and eggs and beat well. Stir in raisins, candied fruits, peels and nuts.
Add enough of the remaining flour to make a soft dough. Turn out onto a lightly floured surface and knead until smooth and elastic, eight to 10 minutes. (Really knead that dough; besides making the bread better, it will help you get rid of the tension of Christmas shopping.)
Place dough in large greased bowl, turning once to grease surface of dough. Cover and let rise in warm place to double size (1-1/2 to 2 hours). Punch down.
Turn out on lightly floured surface. Divide into six equal parts. Cover with towel and let rest 10 minutes.
Roll each part into an oval (about 10 inches long by 6 inches wide) to about 3/8 inch thick. Take one end and fold it over to within about an inch of the other end. This is what gives it the “stollen” shape.
Place stollen on a greased baking sheet. Cover with towel and let rise in a warm place until almost double, about an hour.
Bake in moderate oven (375) for 15-20 minutes or until golden brown. Remove from oven and brush with glaze (see below). Decorate with cut up candied cherries, candied pineapple and citron, or any combination of the above, or with your home-made candied fruit if you are avoiding artificial coloring and flavoring.
Glaze: Mix 2 cups confectioners sugar, 4 Tablespoons milk and a dash of salt. Stir into thin glaze.

Serve in slices and provide plenty of butter. Frozen stollen can thaw in about half an hour at room temperature, or they can be wrapped in foil and heated in the oven.
Here's how they look as they came out of the oven and are cooling off. Do not try to ice them when they aren't cool -- the icing will soak in and or drip completely off. Even after they cool, I will put a tray or waxed paper underneath to catch drips.


Friday, December 16, 2016

Homemade candied fruit

If you have recipes that call for candied fruit (Christmas stollen recipe to come later) but don't like the idea of those gummy-bear-artificial-colored candied fruits at the store, make your own. It isn't difficult, but it is time-consuming. But if you can boil water and peel an orange, you have the skills.

Equipment:
A large saucepan
A medium saucepan (optional, but it reduces the time requirement)
Measuring cup
Wooden spoon (or other non heat-conductive stirring device, although anything would serve in a pinch) 
A wire rack, such as a cooling rack
A cookie pan or some other device to put under the wire rack
Parchment paper (actually, optional, but speeds cleanup) 
Paring knife
Vegetable peeler
Chef's knife
Colander or sieve
Measuring cup

Two methods: One is for candying fresh citrus peels. The second is for candying any dried fruit, such as dried cherries. (Most dried fruit is actually sweet enough for me, but you can up that by poaching briefly in simple syrup. )

For candied orange, lemon or lime peels:
Peel the fruit and cut into strips. (If you dice it now, it will fall through the wire rack, and you don't want that.) I found that peeling the orange the regular way is fine, but for the lime and lemon, I used a vegetable peeler. You don't have to worry about  not getting the white part, the pith -- it will get taken care of in the process.

I need each fruit peel separately, which is probably not necessary, but I wanted to keep them separate for later use.

Put the peels in cold water in the big saucepan and bring to a boil. Boil for a minute or so. Drain in the colander and put back in the saucepan with fresh, cold water. Repeat. Taste. It will taste pretty awful, but is it crunchy or has it softened?  If the peel is still too crunchy, repeat again. This process is called blanching. I put each different peel in a separate bowl once it was blanched, then moved on to the candying part.

Meanwhile, make a simple syrup. It's simple. Equal parts sugar and water, so I used 2 cups sugar and 2 cups water to start with. If that more than halfway fills your saucepan, better keep an eye on it. You only have to bring this to a boil so the sugar dissolves completely, but it will try to boil over if your pan is too small or you walk away. So don't let that happen.

For:
the peel of 4 oranges, 4 lemons, and 4 limes, plus 2 packages of dried cherries, I made two batches of simple syrup, so 4 cups sugar and 4 cups water total. I happened to have some vanilla beans, so I tossed one in while making the simple syrup. Totally optional. I'm sure you could also throw in some spices, maybe a cinnamon stick? I'd make it plain, first.

In the larger saucepan -- because we don't want boilovers -- put about 2 cups of the simple syrup and the fruit peel of your choice. Bring to a low boil and boil for about 20 minutes. Keep an eye on it so you don't end up with caramelized fruit peel, although I'm not sure that would be a bad thing. Having it boil over on the stove, that would be bad. When you have extracted and cooled a piece of the peel and it seems ready -- soft and a little sweet, but still fruit and not a gummy bear -- pour into the sieve over some sort of bowl or vessel to save the simple syrup (more on that later) and dump the peels to the rack which you have set over the baking pan lined with parchment paper. Or whatever rig you can assemble so the excess can drip off of the peel without making a huge mess. While it is still hot, you can sprinkle the peel with a little more sugar. Or not. Tastes vary.

For things like the dried cherries, I just poached them in some simple syrup for a few minutes to plump them up and sweeten them a little. Do this last -- the cherries will turn the simple syrup into cherry-colored and flavored simple syrup.Which leads to ....

Save the simple syrup that you drain from the fruit! You now have citrus-flavored and/or cherry-flavored simple syrup. I haven't decided what to do with it, but I think a bartender friend of mine may have some ideas.

When the candied peels and fruit have cooled, put in airtight containers or baggies and refrigerate. I chopped them before putting them in storage so I wouldn't have to do it when I was ready to use them.. 

I kept one batch of candied lemon peel for months, but mostly because I forgot I had it. My nephew and I found that it makes a good snack if you have leftovers after baking.


Wednesday, October 19, 2016

Spicy pork tenderloin

This is kind of like the spicy cashew chicken I've made before, but this time with pork tenderloin, which is often on sale at stores I frequent. I love pork tenderloin, whether as a schnitzel or, in this case, a Chinese-takeout-inspired dish. This will make four modest servings, two servings if you're ravenous and don't like rice, four if you add more veggies and eat it over rice.

You'll need an ovenproof skillet, saute pan or wok.

One pork tenderloin (usually there are two in a package, each about  1-1/4 pounds each -- it isn't necessary to be too exact). 
Soy sauce
Worcestershire sauce
Honey or brown sugar
Vinegar -- rice wine or red wine are both nice
Peppercorns
Fresh ginger
Garlic
Sweet Red chili sauce -- buy the good stuff in the international food aisle
Canola oil or peanut oil
Cornstarch

Veggies: I used onions, baby leeks and mushrooms. You could easily add carrots, broccoli, peas, etc.


Mix together about 1/4 cup soy sauce, 1 T honey or brown sugar, 1 T canola oil, 1 T vinegar, about 12 peppercorns, two chopped cloves of garlic and a teaspoon or so of grated fresh ginger. (While you are preparing the garlic and ginger, make enough for the sauce below)

Remove as much of the "silver skin" and fat (there shouldn't be much) from the outside of the tenderloin as you can. Slice the pork about 3/4 inch thick.

Put the above mixture in a zip-lock bag with the pork for at least an hour.

Meanwhile, clean and chop whatever veggies you are using.

Make the sauce. The approximate formula is:

  • 1/4 cup soy sauce 
  • 1 T worcestershire sauce
  • 3 Tbs. ketchup
  • 1 to 3 Tablespoons of sweet chili sauce (start with 1).
  • 4 Tbs. vinegar -- rice wine if you have it, but any kind will do
  • 2 to 4 Tbs. honey Start with 2, then add more if needed after you taste the sauce.
  • 3 garlic cloves, minced
  • 1 tsp. (or more) grated fresh ginger
But taste it and adjust to your tastes.

After an hour or two, take the pork out of the fridge and dredge the pieces in cornstarch. Shake the pieces so that there's not too much excess cornstarch, only what will stick to them.

Heat a little canola oil in a heavy skillet or saute pan or wok. You don't need a lot of oil, just a tablespoon or so.

Saute the pork until golden brown on each side but not cooked through and remove to a plate. In the same pan, saute the veggies, starting with the "hardest" ones first (i.e, carrots take longer to cook than mushrooms.) They don't have to be "done," just softened up a bit. While you're doing this, set the oven to 350 degrees.

When the veggies have softened a bit, put the pork on top of them, pour the sauce over them. Then pour about 1 cup water or even chicken stock into the pan from the side so you don't wash the sauce off the top of the pork pieces. (If you add the water to the sauce first, it also won't stick as well to the meat.  We want it to stick to the meat so that carmelization will happen in the next step. But we want the additional liquid so that as the next step happens and the sauce thickens and condenses, we will still have enough sauce.)

Now, put the oven-proof skillet (or whatever) into the pre-heated oven and cook for 30 to 40 minutes. 

If you like rice, make rice. Or quinoa or couscous. 


Sunday, May 1, 2016

Day One of the pantry/freezer challenge: I'm trying to use up things in my overstocked freezer and pantry.

Risotto with mushrooms and pork tenderloin

Ingredients:
from the freezer:
1 quart of homemade chicken broth\, thawed
5 slices of roasted pork tenderloin, thawed

from the pantry
1 cup basmati rice
1 package dried morel mushrooms
three threads of saffron (totally optional -- I have it and never use it, which is stupid)
pepper

from the fridge
 1 lonely green onion about to turn
1 cup cremini mushrooms,  ditto

from the window sill
three leaves of basil
2 cloves garlic

from the wine rack
1/2 white wine, not counting what I sipped while stirring the risotto for 20 minutes

Lift the disk of chicken fat off the top of the broth and put it into a small bowl.
Rinse the dried mushrooms and soak them for 20 minutes in about 1 cup of the chicken stock. Drain, pouring the broth back into a saucepan with the rest of the broth. Heat the broth slowly over low heat.
Slice the cremini and morel mushrooms and the green onion (if you had more, or chives, sure).

Heat a large skillet (I used my indispensable cast iron chicken fryer, which has nice tall sides that help keep me from making a huge mess when I stir things) with about 2 T of the chicken fat. Or olive oil. Saute the mushrooms, onion and garlic and remove.

Put another tablespoon or two of the fat/oil in the skillet, on medium -- not too high! -- and add the rice. Stir very frequently but not constantly. The goal is to "toast" the rice slightly until the edges are translucent and slightly golden.

Add 1/2 cup white wine and continue to cook until it is absorbed.

Begin adding the heated broth 1/2 cup at a time. The pan should be just hot enough so that the broth simmers but doesn't boil. Toss in the saffron if you have it. Stir almost constantly, except when you are reaching for the wineglass. When the first dose of broth is absorbed, add another. Repeat, for about 20 minutes, until the rice is tender but still "al dente" and not soggy.

Add the mushrooms and meat (optional) and heat through.
Chiffonade the basil and sprinkle on top.


Saturday, January 23, 2016

Guinness Bread

And, no, this isn't a sacrilegious waste of Guinness -- I got the recipe in Ireland, so it is totally approved. And to make things easier, I converted it from metric to U.S.

1-1/8 C whole wheat flour
3/4 C all-purpose flour
1/4 C rolled oats (old-fashioned oats), plus a bit extra for decoration
3/4 teaspoon salt
1-1/2 teaspoons baking soda

3/4 C milk
3/4 C buttermilk
1/4 C molasses (Irish recipe says black treacle)
1-1/8 Tablespoon melted butter
1/3 C Guinness.

Preheat oven to 375 F.
 Mix dry ingredients and set aside. 
Bring all wet ingredients to room temperature, mix, and mix with dry ingredients. The batter will be very wet.
Bake at 375F for about 45 minutes if using a standard metal loaf pan. (The Irish recipe said 190 C for 1 hour and 10 minutes, which seemed too long; maybe they use a different type of baking

pan, perhaps ceramic?) Meanwhile, drink the rest of the bottle of Guinness. Or the rest of the six-pack, your call. As with all quick breads, let it cool for 10-15 minutes before slicing so it won't crumble. It will still be warm enough to melt butter.


Thursday, January 21, 2016

Whole wheat sandwich bread

I can't claim credit for this recipe, so I will just share the link. This loaf slices really well for sandwiches or toast, as long as you have a good serrated bread knife. And you can slice it fairly thinly without it crumbling, which is not always the case with homemade bread.

http://www.thekitchn.com/how-to-make-basic-whole-wheat-sandwich-bread-cooking-lessons-from-the-kitchn-167267

The one thing I do differently is that I don't haul out the stand mixer. I just mix it by hand and knead it by hand, because for me, that's one of the two best things about making homemade bread. Also, because it is the way I was taught, I do scald the milk, even if it's just by zapping it in the microwave. Just be sure to let it cool to "body temp" before adding to the yeast mixture.

The recipe is almost exactly the same as my late father's recipe for whole wheat bread, except his makes six loaves, and that's too much for me. Two loaves, I can deal with.

Unlike most homemade breads, which, because they don't have preservatives, usually dry out overnight, this lasts several days, especially if you put it in a plastic bag after it has completely cooled. And it freezes well, again, in a heavy duty plastic bag with as much air sucked out as you can manage. I'm pretty sure that the honey is what helps keep it so long, so it might not work as well if you were substituting brown sugar or something because you were out of honey (you'd need to add a little more liquid as well in that case).

Followers

About Me

My photo
This is me enjoying a limoncello in Rome on the last night of our trip to Italy. Funny thing is, I don't really like limoncello that much, but thought it would be great in a dessert. And wouldn't you know, The Barefoot Contessa just did a great fruit salad with limoncello. So now I can't. Oh, well.